Integrate MS Teams Via Admin Console
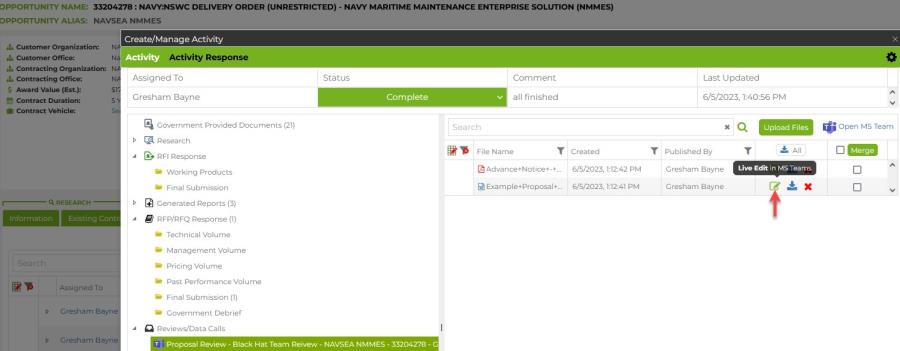
- A C2P Opportunity = MS Team
- A C2P Activity = MS Teams Channel
- Your organizational Teams permissions remain intact, enabling C2P Teams integration will not allow any user do something in Teams they couldn’t do otherwise within your organization (e.g. create a team/channel, invite a guest, etc.)
-
This integration handles the granting of permissions to each channel based on who is assigned to the corresponding Activity.
- While you can go into Teams and manually add/remove members & documents to an existing Channel created by an Activity, C2P will not recognize these changes since they were not setup when the Activity was created.
- The documents attached to an Activity reside within your organization’s Teams environment, but can be copied into any C2P Documents folder within the opportunity via the Activity Response in C2P.
Before you can complete the actions in the Admin Console, you will need to complete some actions in Azure AD.
Setting up the Connection between Capture2Proposal and Azure
These are notes for how to allow the C2P MVC app to integrate with users' MS Teams and Outlook accounts. This allows the C2P app to create Teams rooms from the Activity tab within each Company Pipeline opportunity. Microsoft Teams available in the standard commercial cloud, or in the US National secure cloud (GCCH).

- Add the C2P app to Azure AD: Register C2P with the Azure AD v2.0 endpoint - Microsoft Graph | Microsoft Docs
- Go to Azure Active Directory g click App Registrations g New Registration
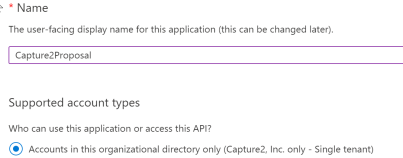
- Use Capture2Proposal as the name of the app and select the Single Tenant option under “Who can use this application or access this API?”
- Enter https://app.capture2proposal.us/Account/OAuthResponse as the Web redirect path g click Register

- After registering the App, it will open your new App registration (you can navigate back to this page at any time by going to the Azure Portal and selecting Azure Active Directory → App registrations → Capture2Proposal)
- In the Authentication page for your new app registration:
- Scroll down to select the tokens you would like to be issued by the authorization endpoint:
- Check the option for ID tokens (used for implicit and hybrid flows)
- Uncheck Access tokens (used for implicit flows).

- Scroll down to Advanced Settings and confirm “Allow public client flows” is set to NO

- Click Save at the top of the page (no other settings are necessary here)
- Scroll down to select the tokens you would like to be issued by the authorization endpoint:
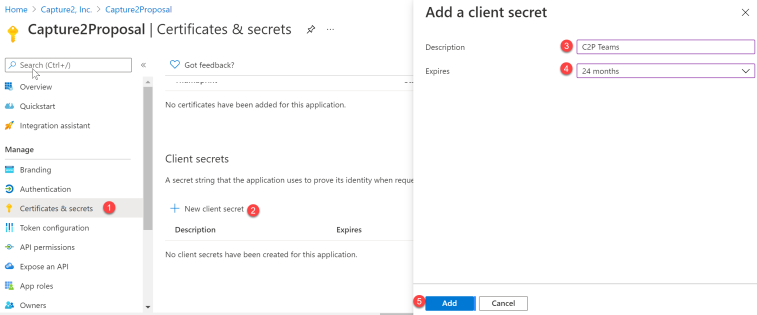
- Click the Certificates & Secrets page
- Click “New client secret”
- Enter any description you would like
- Enter an expiration you deem appropriate, keeping in mind you will need to copy new keys into the C2P Admin Console when the expiration occurs
- Click the Add button
- Copy/paste the value somewhere like Notepad (it will be hidden permanently in the Portal after a few minutes)

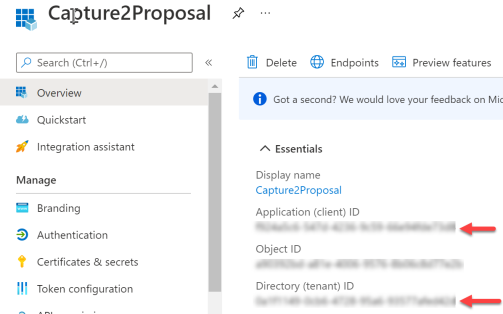
- Go back to the Overview page on your app registration and copy/paste the Application (client) ID and Directory (tenant) ID to your notepad
- Login to the C2P app in a new web browser window and log in (you may close the Azure portal if desired)
- Open the Capture2Proposal Admin Console → Integration → Microsoft Teams (you must be a licensed BD Manager or Admin).
- For Commercial Public Cloud or GCC Low Side, use the Commercial Public Cloud row for your credentials. If you are uncertain which version you have, look at how you access azure. If you access AAD via portal.azure.com, then you are probably using commercial MS Teams.
- For GCC High, enter your credentials in the row for US National GCCH Cloud. If you log in to azure using portal.azure.us, you are probably using GCCH.
- If you enable access in both versions of Teams, GCCH will be the default for all new activites.
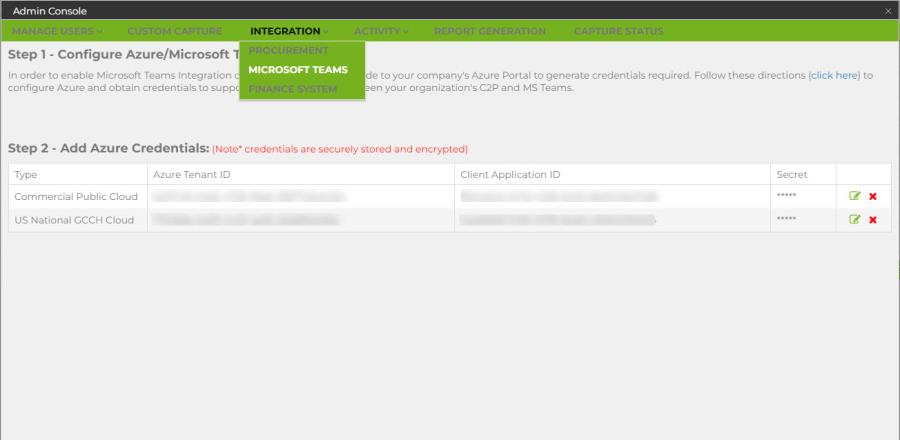
- Click the green pencil icon to enter the IDs copied above from Azure here
- Enter the Directory (tenant) ID from Azure into Azure Tenant ID
- Enter the Application (client) ID from Azure into Client Application ID
- Enter the Client Secret value from step 3(e) into Client Application Secret g click the disk icon to save
**NOTE** The “Client Application Secret” is like a password. Do not store it anywhere after entering it into your C2P configuration. C2P will store this data in secure Key Vault storage in Azure to ensure it is safe. If you ever need to refresh your client secret you may generate a new one in Azure and enter the new one in the C2P Admin Console. This may require users who are currently logged in to C2P to re-authenticate.
- Enter the Client Secret value from step 3(e) into Client Application Secret g click the disk icon to save
- Return to the Azure Portal g Click API permissions g Add a Permission g Microsoft Graph g Delegated Permissions
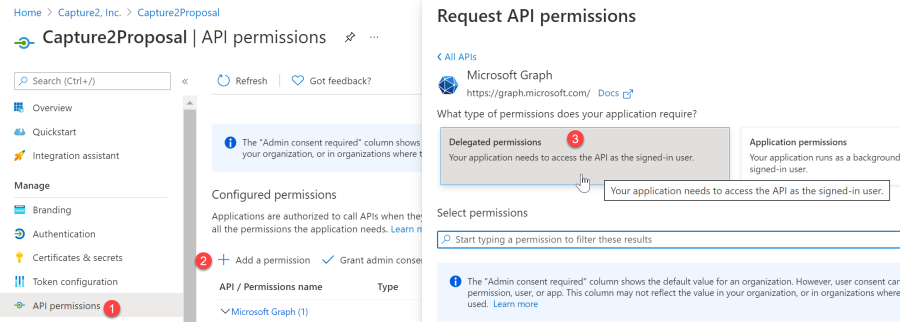
Repeat the steps above to search and add each individual permission below for the API:- Calendars.ReadWrite
- Channel.Create
- Channel.ReadBasic.All
- ChannelMember.ReadWrite.All
- Files.ReadWrite.All
- Group.ReadWrite.All
- Mail.Send
- Team.ReadBasic.All
- TeamMember.ReadWrite.All
- User.Invite.All
- User.Read
- User.ReadBasic.All
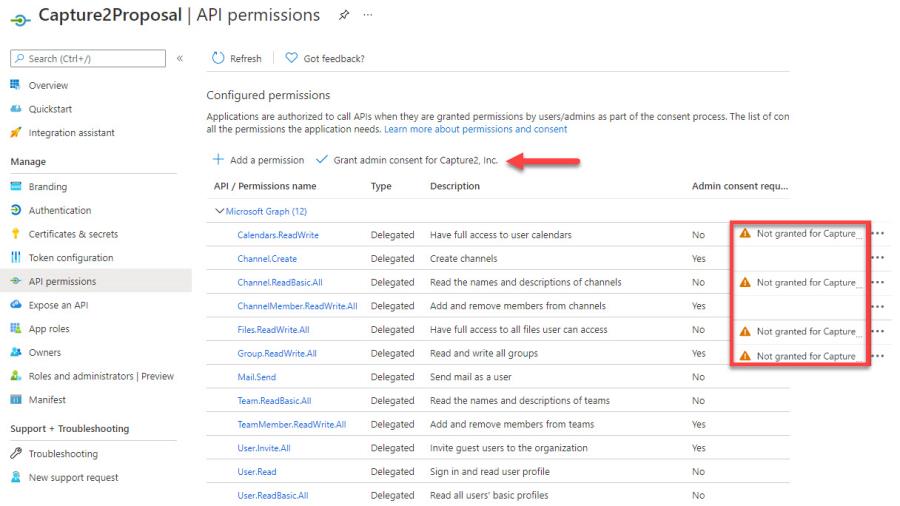
**NOTE** All permissions granted to the application will be Delegated, meaning that the logged in user may only use the C2P app to do things they are permitted to do in their Teams environment. This means, that if a user is not permitted to create a Team, or invite a guest to a Team, some feature may not work as designed to preserve the security of your Teams environment.
-
If you see the permissions alerts shown above, click the “Grant admin consent for ____” button g Yes to resolve and grant these permissions for the App Registration. If you do not see the button to grant admin consent, contact the Azure administrator within your organization to assist.
If you're still having issues after following these instructions, check out our MS Teams Integration Troubleshooting page for more help.